This is the first post in a series on provisioning a Kubernetes cluster in AWS using HashiCorp Terraform. This part covers the foundational VPC network — the isolated virtual network that hosts the cluster. By the end of this guide, the result is a working VPC with public and private subnets across two availability zones, an internet gateway, a NAT gateway, and the route tables that tie them together.
No prior knowledge of Terraform is required, but the guide assumes a basic understanding of routing tables, NAT, and AWS networking concepts (elastic IPs, etc.).
Install packages
Use your preferred package manager to install the AWS CLI and Terraform to your host machine.
brew tap hashicorp/tap
brew install hashicorp/tap/terraform
brew install awscliCreate AWS CLI credentials and log in
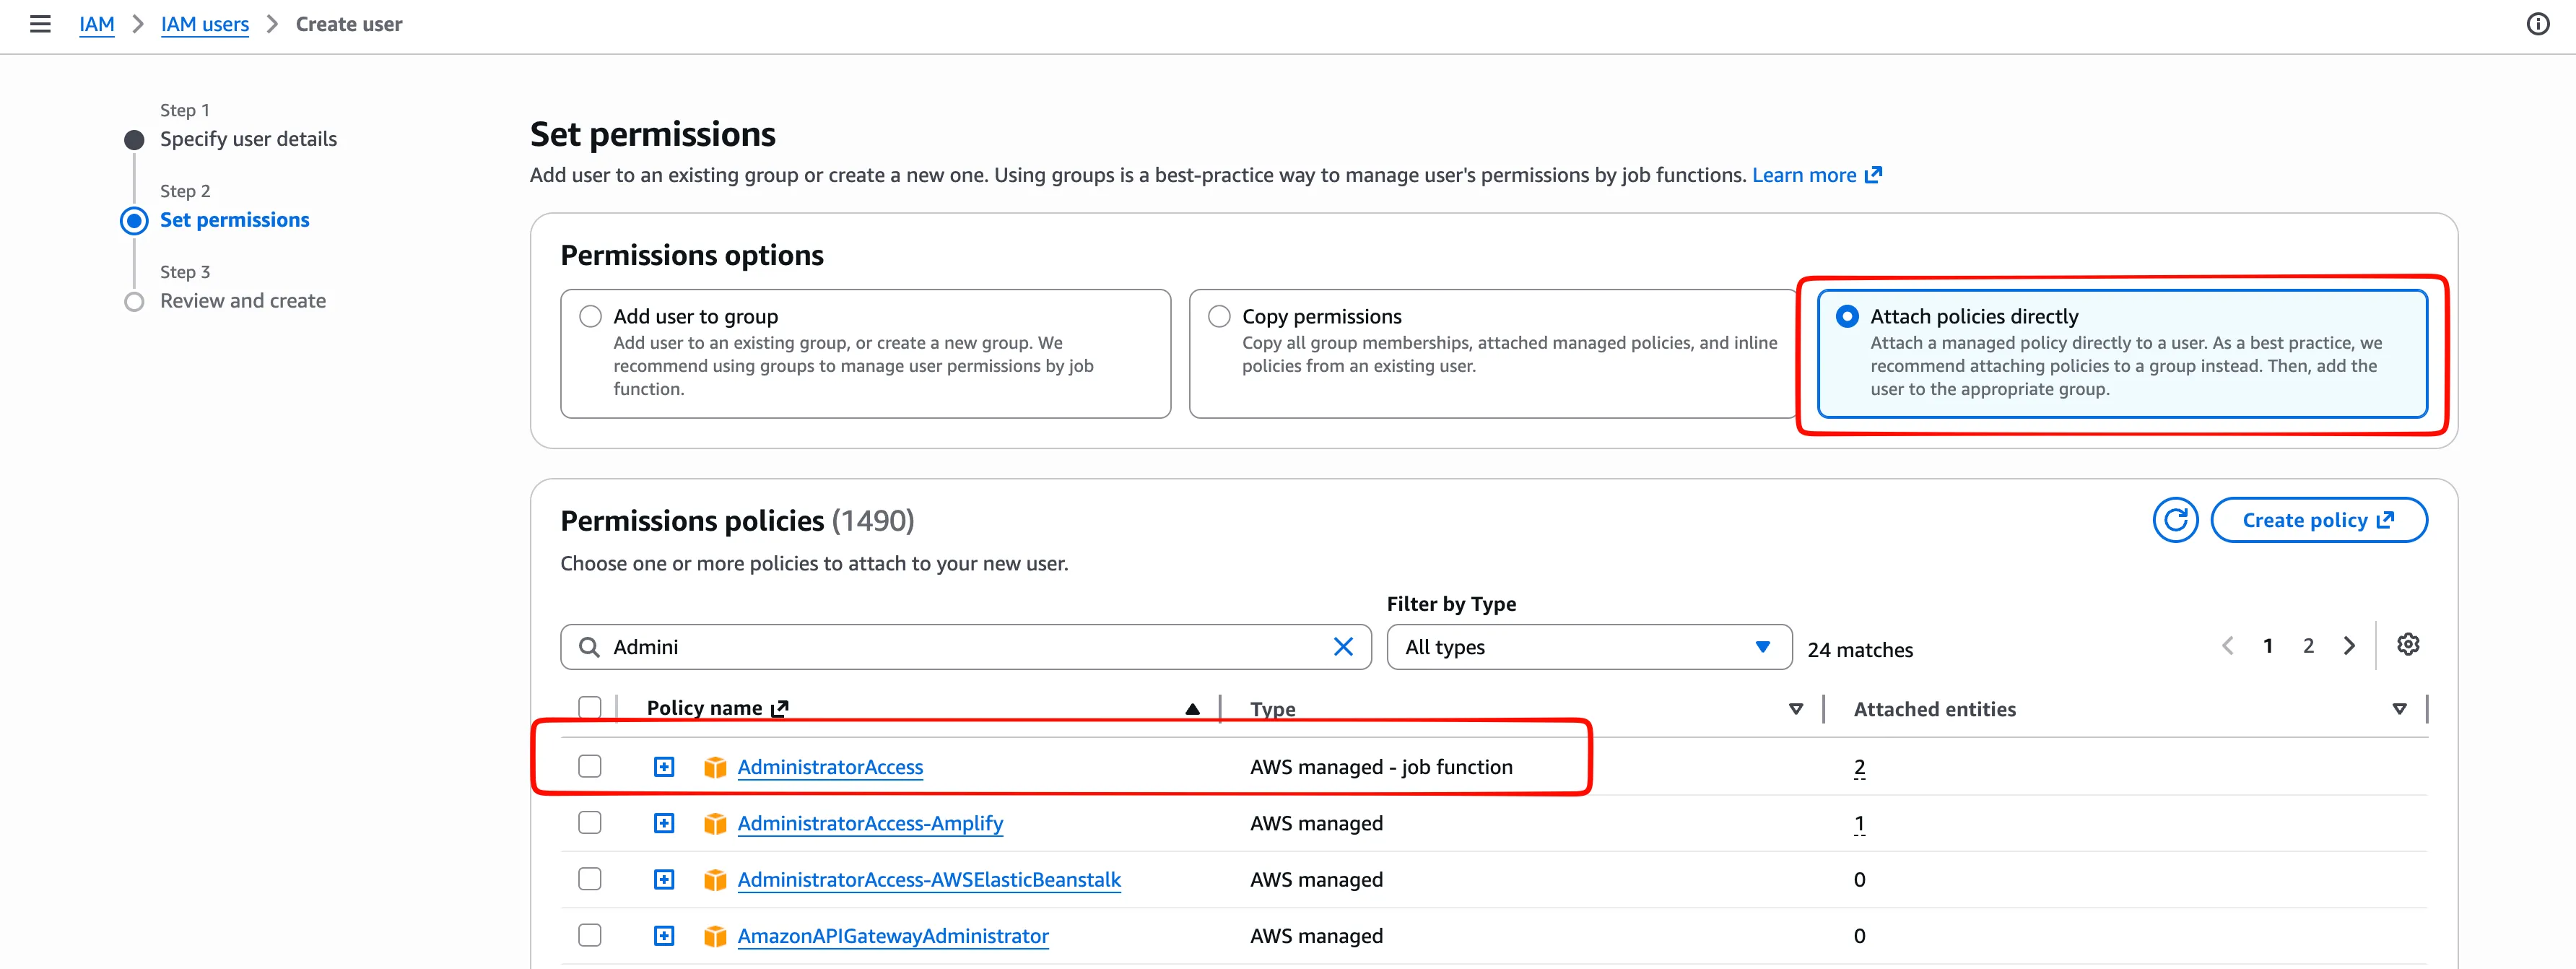
Create an IAM user with appropriate credentials (you can give it “AdministratorAccess” if this is a learning environment, but this should not be used in production).
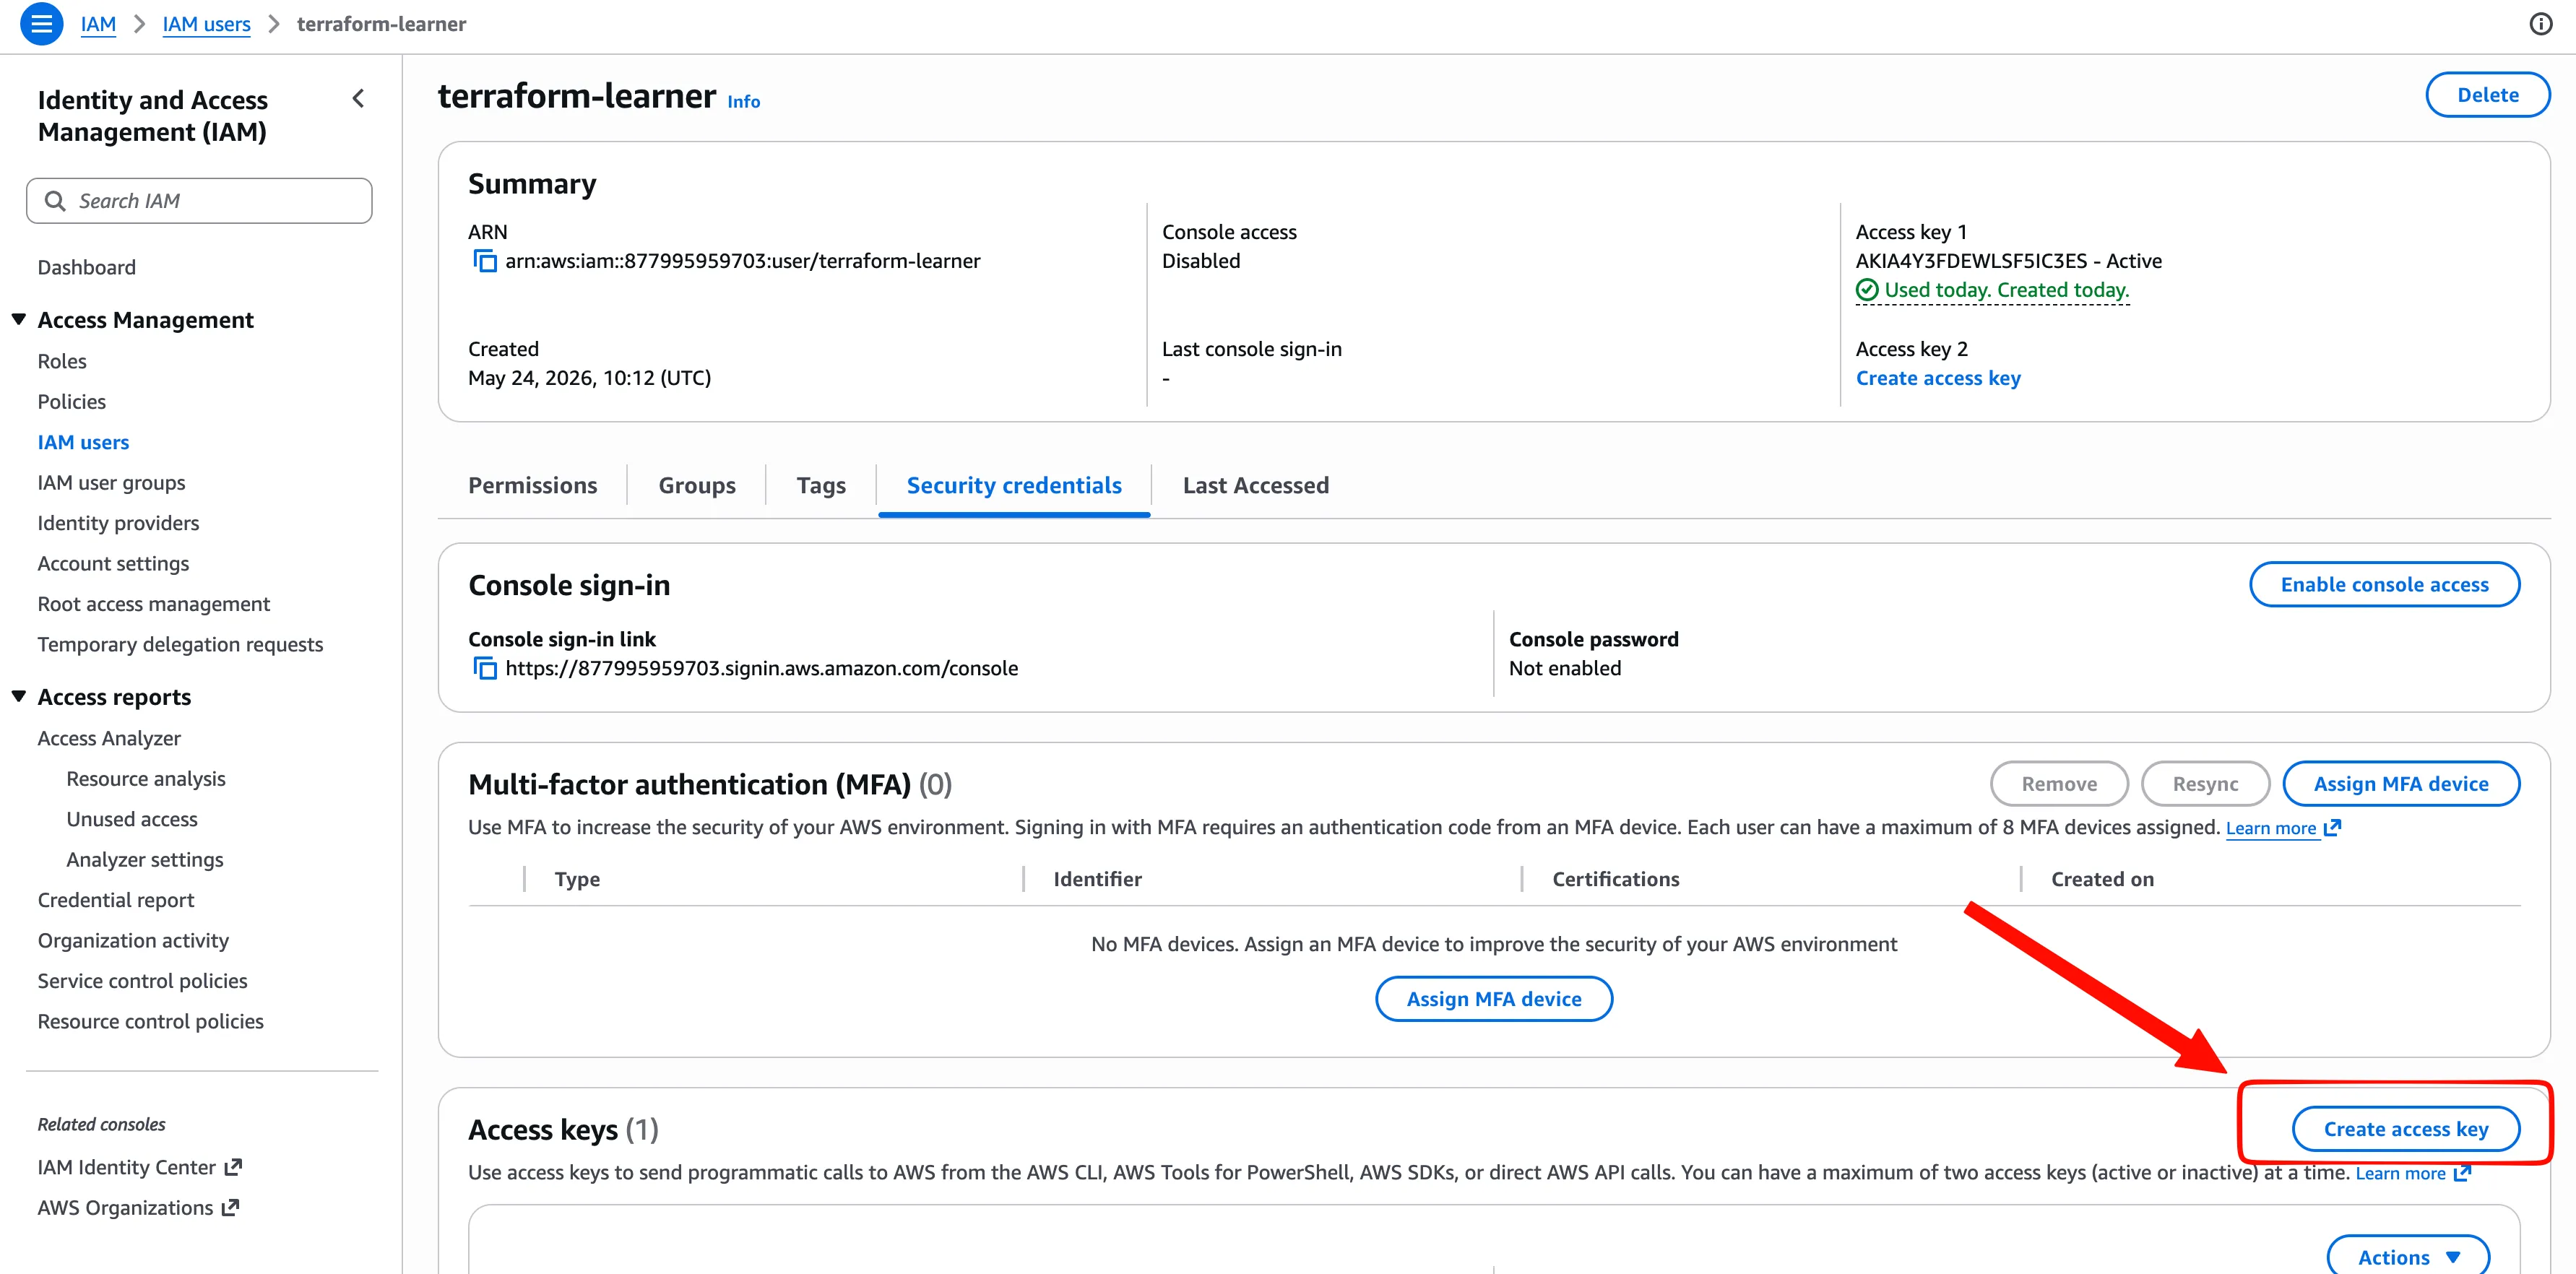
Create an access key to log in using the AWS CLI. It consists of:
- Access Key ID — think of this as a username. It identifies who is making the request.
- Secret Access Key — think of this as a password. It proves you’re really that user. This must stay secret; if someone gets it, they can do anything your AWS account has permission to do.
Run aws configure on your host machine.
When you run this command, it stores the key ID and secret key in a file on your machine at ~/.aws/credentials. Terraform automatically reads those credentials to perform actions as your IAM user.
Check that your AWS credentials are valid by running aws sts get-caller-identity (STS stands for Security Token Service).
Initialize Terraform
Specify the AWS provider by creating provider.tf:
terraform {
  required_providers {
    aws = {
        source = "hashicorp/aws"
        version = "~> 6.0"
    }
  }
}

provider "aws" {
  # Specify your AWS region
  region = "eu-central-1"
}
~> means “pessimistic constraint.” It locks you to the same minor version, but allows patches. ~> 6.0 means ”>= 6.0 and < 7.0” — any 6.x is fine, but 7.0 won’t be installed without you explicitly updating this.
Run terraform init. This command initializes a working directory containing Terraform configuration files. It should be the first command run after writing a new Terraform configuration or cloning an existing one from version control. It is safe to run multiple times.
Run ls -la and you’ll see two new things:
- .terraform/ — a directory where Terraform stores the downloaded provider plugins. It’s like node_modules or a Python virtualenv — auto-generated, never commit it to git.
- .terraform.lock.hcl — a lock file that records the exact provider version and checksums. This means if you or someone else runs terraform init later, they get the exact same binary, byte for byte. Commit this to git.
Define a VPC using Terraform
After setting up prerequisites, AWS resources can be defined. Study the EKS VPC Requirements before defining a VPC for your cluster.
Start by creating a VPC (Virtual Private Cloud) — an isolated slice of the AWS cloud that you control. Think of it as your own private data center, but defined in software.
The VPC is defined in VPC.tf:
resource "aws_vpc" "kubernetes" {
  cidr_block = "10.0.0.0/16"
  enable_dns_hostnames = true # Kubernetes nodes need to resolve each other by name
}
You can do a ‘dry-run’ and see what is going to be created by running terraform plan.
Apply the changes by running terraform apply.
See what terraform is currently tracking by running terraform show.
Visualization of generated resources:
graph TB
    subgraph AWS["AWS eu-central-1"]
        subgraph VPC["VPC (10.0.0.0/16)"]
    end
end
style AWS fill:#FFF3E0,stroke:#FF9900,stroke-width:2px
style VPC fill:#F3E5F5,stroke:#7B1FA2,stroke-width:2px
Next, define subnets in the same VPC.tf file.
Two kinds of subnets across two availability zones (AZs) are needed:
- Public subnets — for load balancers and the NAT Gateway (the things that need to be open to new connections from the internet).
- Private subnets — for EKS worker nodes (the things that will be hidden behind NAT). Per the EKS VPC Requirements, EKS subnets need to be in at least two different availability zones.
resource "aws_subnet" "kubernetes-public-1a" {
    vpc_id = aws_vpc.kubernetes.id
    cidr_block = "10.0.101.0/24"
    availability_zone = "eu-central-1a"
    # any EC2 instance launched in this subnet automatically gets a public IPv4 address
    map_public_ip_on_launch = true
}

resource "aws_subnet" "kubernetes-public-1b" {
    vpc_id = aws_vpc.kubernetes.id
    cidr_block = "10.0.102.0/24"
    availability_zone = "eu-central-1b"
    # any EC2 instance launched in this subnet automatically gets a public IPv4 address
    map_public_ip_on_launch = true
}

resource "aws_subnet" "kubernetes-private-1a" {
    vpc_id = aws_vpc.kubernetes.id
    cidr_block = "10.0.201.0/24"
    availability_zone = "eu-central-1a"
}

resource "aws_subnet" "kubernetes-private-1b" {
    vpc_id = aws_vpc.kubernetes.id
    cidr_block = "10.0.202.0/24"
    availability_zone = "eu-central-1b"
}
Note the use of vpc_id = aws_vpc.kubernetes.id. Hardcoding the VPC ID directly would work, but referencing the Terraform resource attribute keeps the definition reusable — if the VPC is ever recreated, the subnets will automatically pick up the new ID.
Visualization of generated resources:
graph TB
    subgraph AWS["AWS eu-central-1"]
        subgraph VPC["VPC (10.0.0.0/16)"]

            subgraph AZ1a["Availability Zone 1a"]
                PubSub1a["🌐 Public Subnet<br/>10.0.101.0/24"]
                PrivSub1a["🔒 Private Subnet<br/>10.0.201.0/24"]
            end

            subgraph AZ1b["Availability Zone 1b"]
                PubSub1b["🌐 Public Subnet<br/>10.0.102.0/24"]
                PrivSub1b["🔒 Private Subnet<br/>10.0.202.0/24"]
            end
    end
end

style AWS fill:#FFF3E0,stroke:#FF9900,stroke-width:2px
style VPC fill:#F3E5F5,stroke:#7B1FA2,stroke-width:2px
style AZ1a fill:#F5F5F5,stroke:#9E9E9E,stroke-width:1px
style AZ1b fill:#F5F5F5,stroke:#9E9E9E,stroke-width:1px
style PubSub1a fill:#B6D0E2,stroke:#9E9E9E,stroke-width:1px
style PubSub1b fill:#B6D0E2,stroke:#9E9E9E,stroke-width:1px
style PrivSub1a fill:#B6D0E2,stroke:#9E9E9E,stroke-width:1px
style PrivSub1b fill:#B6D0E2,stroke:#9E9E9E,stroke-width:1px
Continue by defining an internet gateway for the public subnets.
# Purely logical resource, does not spin up a physical instance.
# When a resource in a public subnet reaches the internet, it uses its own public IP
# The IGW just forwards traffic — it never rewrites the source address.
resource "aws_internet_gateway" "pub-gw-1" {
  vpc_id = aws_vpc.kubernetes.id
}
graph TB
subgraph AWS["AWS eu-central-1"]
subgraph VPC["VPC (10.0.0.0/16)"]
IGW["Internet Gateway<br/>pub-gw-1"]
subgraph AZ1a["Availability Zone 1a"]
PubSub1a["🌐 Public Subnet<br/>10.0.101.0/24"]
PrivSub1a["🔒 Private Subnet<br/>10.0.201.0/24"]
end
subgraph AZ1b["Availability Zone 1b"]
PubSub1b["🌐 Public Subnet<br/>10.0.102.0/24"]
PrivSub1b["🔒 Private Subnet<br/>10.0.202.0/24"]
end
end
end
IGW<-->|"↕️ two-way traffic"|Internet
Internet["☁️<br>Public<br/>Internet"]
style AWS fill:#FFF3E0,stroke:#FF9900,stroke-width:2px
style VPC fill:#F3E5F5,stroke:#7B1FA2,stroke-width:2px
style AZ1a fill:#F5F5F5,stroke:#9E9E9E,stroke-width:1px
style AZ1b fill:#F5F5F5,stroke:#9E9E9E,stroke-width:1px
style IGW fill:#B6D0E2,stroke:#9E9E9E,stroke-width:1px
style PubSub1a fill:#B6D0E2,stroke:#9E9E9E,stroke-width:1px
style PubSub1b fill:#B6D0E2,stroke:#9E9E9E,stroke-width:1px
style PrivSub1a fill:#B6D0E2,stroke:#9E9E9E,stroke-width:1px
style PrivSub1b fill:#B6D0E2,stroke:#9E9E9E,stroke-width:1pxGateways are useless without route tables. Create the public route table and associate it with the public subnets.
resource "aws_route_table" "pub-rt" {
    vpc_id = aws_vpc.kubernetes.id
    route {
        cidr_block = "0.0.0.0/0"
        gateway_id = aws_internet_gateway.pub-gw-1.id
    }
}
resource "aws_route_table_association" "pub-rt-kubernetes-public-1a" {
  subnet_id = aws_subnet.kubernetes-public-1a.id
  route_table_id = aws_route_table.pub-rt.id
}
resource "aws_route_table_association" "pub-rt-kubernetes-public-1b" {
  subnet_id = aws_subnet.kubernetes-public-1b.id
  route_table_id = aws_route_table.pub-rt.id
}
graph TB
subgraph AWS["AWS eu-central-1"]
subgraph VPC["VPC (10.0.0.0/16)"]
IGW["Internet Gateway<br/>pub-gw-1"]
subgraph AZ1a["Availability Zone 1a"]
PubSub1a["🌐 Public Subnet<br/>10.0.101.0/24"]
PrivSub1a["🔒 Private Subnet<br/>10.0.201.0/24"]
end
subgraph AZ1b["Availability Zone 1b"]
PubSub1b["🌐 Public Subnet<br/>10.0.102.0/24"]
PrivSub1b["🔒 Private Subnet<br/>10.0.202.0/24"]
end
PubRT["Public Route Table<br/>pub-rt"]
end
end
PubRT-->|"0.0.0.0/0 -> IGW"|IGW
PubSub1a-->|"associated"|PubRT
PubSub1b-->|"associated"|PubRT
IGW<-->|"↕️ two-way traffic"|Internet
Internet["☁️<br>Public<br/>Internet"]
style AWS fill:#FFF3E0,stroke:#FF9900,stroke-width:2px
style VPC fill:#F3E5F5,stroke:#7B1FA2,stroke-width:2px
style AZ1a fill:#F5F5F5,stroke:#9E9E9E,stroke-width:1px
style AZ1b fill:#F5F5F5,stroke:#9E9E9E,stroke-width:1px
style IGW fill:#B6D0E2,stroke:#9E9E9E,stroke-width:1px
style PubSub1a fill:#B6D0E2,stroke:#9E9E9E,stroke-width:1px
style PubSub1b fill:#B6D0E2,stroke:#9E9E9E,stroke-width:1px
style PrivSub1a fill:#B6D0E2,stroke:#9E9E9E,stroke-width:1px
style PrivSub1b fill:#B6D0E2,stroke:#9E9E9E,stroke-width:1pxNext, define a NAT Gateway and the Elastic IP assigned to it.
# A NAT Gateway is an actual managed service running on AWS infrastructure in a specific subnet
resource "aws_nat_gateway" "priv-gw-1a-1" {
    # NAT Gateway lives inside a specific subnet and does not need vpc_id
    subnet_id = aws_subnet.kubernetes-public-1a.id
    # NAT Gateway needs an EIP allocated before it can start
    allocation_id = aws_eip.nat-eip-1a-1.id
}
resource "aws_eip" "nat-eip-1a-1" {}

# A second NAT GW should be set up in production, but this guide omits it — running two is expensive for a learning project that does not need 99% uptime
# resource "aws_nat_gateway" "priv-gw-1b-1" {
#     # NAT Gateway lives inside a specific subnet and does not need vpc_id
#     subnet_id = aws_subnet.kubernetes-public-1b.id
#     # NAT Gateway needs an EIP allocated before it can start
#     allocation_id = aws_eip.nat-eip-1b-1.id
# }
# resource "aws_eip" "nat-eip-1b-1" {}
graph TB
subgraph AWS["AWS eu-central-1"]
subgraph VPC["VPC (10.0.0.0/16)"]
IGW["Internet Gateway<br/>pub-gw-1"]
subgraph AZ1a["Availability Zone 1a"]
PubSub1a["🌐 Public Subnet<br/>10.0.101.0/24"]
PrivSub1a["🔒 Private Subnet<br/>10.0.201.0/24"]
subgraph NGW["NAT Gateway priv-gw-1a-1"]
EIP["Elastic IP<br/>nat-eip-1a-1"]
end
end
subgraph AZ1b["Availability Zone 1b"]
PubSub1b["🌐 Public Subnet<br/>10.0.102.0/24"]
PrivSub1b["🔒 Private Subnet<br/>10.0.202.0/24"]
end
PubRT["Public Route Table<br/>pub-rt"]
end
EIP["Elastic IP<br/>nat-eip-1a-1"]
end
PubRT-->|"0.0.0.0/0 -> IGW"|IGW
PubSub1a-->|"associated"|PubRT
PubSub1b-->|"associated"|PubRT
IGW<-->|"↕️ two-way traffic"|Internet
EIP-->|"↙️ egress-initiated<br/>only"|Internet
Internet["☁️<br>Public<br/>Internet"]
style AWS fill:#FFF3E0,stroke:#FF9900,stroke-width:2px
style VPC fill:#F3E5F5,stroke:#7B1FA2,stroke-width:2px
style AZ1a fill:#F5F5F5,stroke:#9E9E9E,stroke-width:1px
style AZ1b fill:#F5F5F5,stroke:#9E9E9E,stroke-width:1px
style PubSub1a fill:#A9A9A9,stroke:#9E9E9E,stroke-width:1px
style PubSub1b fill:#A9A9A9,stroke:#9E9E9E,stroke-width:1px
style PrivSub1a fill:#A9A9A9,stroke:#9E9E9E,stroke-width:1px
style PrivSub1b fill:#A9A9A9,stroke:#9E9E9E,stroke-width:1px
style IGW fill:#B6D0E2,stroke:#9E9E9E,stroke-width:1px
style NGW fill:#B6D0E2,stroke:#9E9E9E,stroke-width:1pxFinally, define and associate routes for private subnets.
resource "aws_route_table" "priv-rt" {
  vpc_id = aws_vpc.kubernetes.id
  route {
    cidr_block = "0.0.0.0/0"
    # Use nat_gateway_id here, not gateway_id (which is only for internet gateways)
    nat_gateway_id = aws_nat_gateway.priv-gw-1a-1.id
  }
}
resource "aws_route_table_association" "priv-rt-kubernetes-private-1a" {
  subnet_id = aws_subnet.kubernetes-private-1a.id
  route_table_id = aws_route_table.priv-rt.id
}
resource "aws_route_table_association" "priv-rt-kubernetes-private-1b" {
  subnet_id = aws_subnet.kubernetes-private-1b.id
  route_table_id = aws_route_table.priv-rt.id
}
graph TB
subgraph AWS["AWS eu-central-1"]
subgraph VPC["VPC (10.0.0.0/16)"]
IGW["Internet Gateway<br/>pub-gw-1"]
subgraph AZ1a["Availability Zone 1a"]
PubSub1a["🌐 Public Subnet<br/>10.0.101.0/24"]
PrivSub1a["🔒 Private Subnet<br/>10.0.201.0/24"]
subgraph NGW["NAT Gateway priv-gw-1a-1"]
EIP["Elastic IP<br/>nat-eip-1a-1"]
end
end
subgraph AZ1b["Availability Zone 1b"]
PubSub1b["🌐 Public Subnet<br/>10.0.102.0/24"]
PrivSub1b["🔒 Private Subnet<br/>10.0.202.0/24"]
end
PubRT["Public Route Table<br/>pub-rt"]
PrivRT["Private Route Table<br/>priv-rt"]
end
end
PubRT-->|"0.0.0.0/0 -> IGW"|IGW
PrivRT-->|"0.0.0.0/0 -> NAT"|NGW
IGW<-->|"↕️ two-way traffic"|Internet
EIP-->|"↙️ egress-initiated<br/>only"|Internet
Internet["☁️<br>Public<br/>Internet"]
PubSub1a-->|"associated"|PubRT
PubSub1b-->|"associated"|PubRT
PrivSub1a-->|"associated"|PrivRT
PrivSub1b-->|"associated"|PrivRT
style AWS fill:#FFF3E0,stroke:#FF9900,stroke-width:2px
style VPC fill:#F3E5F5,stroke:#7B1FA2,stroke-width:2px
style AZ1a fill:#F5F5F5,stroke:#9E9E9E,stroke-width:1px
style AZ1b fill:#F5F5F5,stroke:#9E9E9E,stroke-width:1px
style PubSub1a fill:#A9A9A9,stroke:#9E9E9E,stroke-width:1px
style PubSub1b fill:#A9A9A9,stroke:#9E9E9E,stroke-width:1px
style PrivSub1a fill:#A9A9A9,stroke:#9E9E9E,stroke-width:1px
style PrivSub1b fill:#A9A9A9,stroke:#9E9E9E,stroke-width:1px
style IGW fill:#B6D0E2,stroke:#9E9E9E,stroke-width:1px
style NGW fill:#B6D0E2,stroke:#9E9E9E,stroke-width:1pxApply your config by runing terraform apply
At the time of writing, the NAT Gateway bills at $0.052/hour in Frankfurt (~$1.2/day, ~$37/month) the moment terraform apply finishes. When you’re done for the day, run terraform destroy to tear everything down so you don’t wake up to surprise charges. The NAT Gateway is the only expensive thing in this setup — everything else (VPC, subnets, route tables, IGW, EIP attached to a NAT GW) is free or pennies.
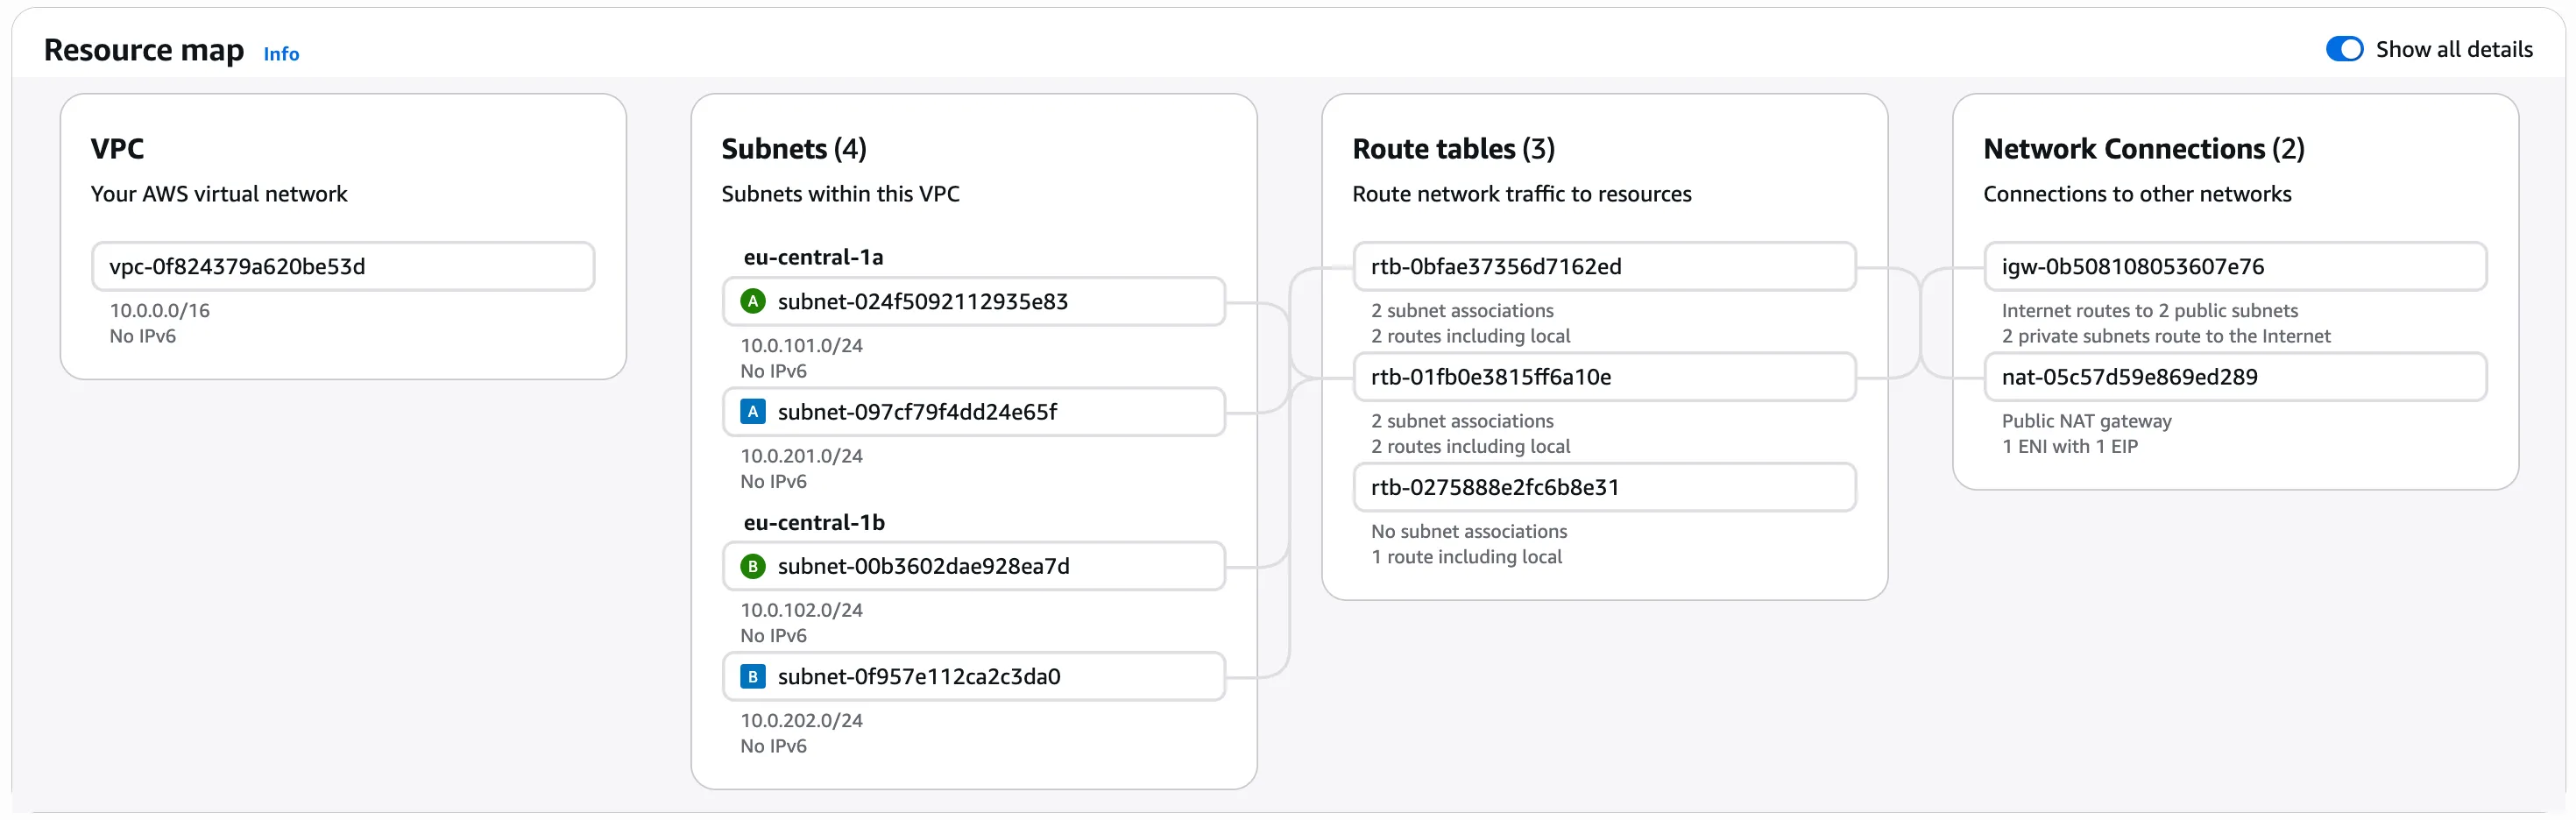
AWS-generated resource map:
What’s next
The VPC is now fully defined: public subnets route through the internet gateway, private subnets route through the NAT gateway, and everything is spread across two availability zones. Running terraform apply at this point provisions the entire network stack — the result is visible in the final diagram above.
Part 2 will cover the EKS cluster itself: the control plane, IAM roles for service accounts, and the node groups that run the actual workloads inside these private subnets.